5.5 KiB

KX-Bridge
Control your Anycubic Kobra X with OrcaSlicer — no Klipper, no Raspberry Pi.
A Moonraker-compatible bridge that talks directly to the printer.
Like KX-Bridge? A coffee on Ko-fi keeps the project alive. ☕
✨ Features
| 🖨️ | Printer control — start, pause, resume, cancel, temperatures, print speed |
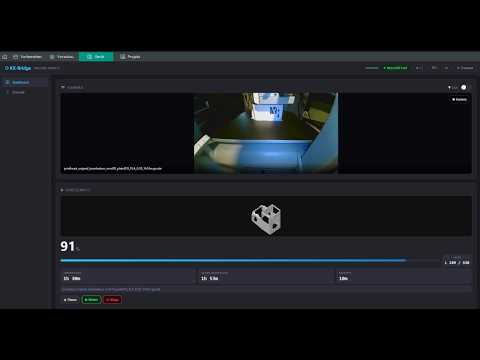
| 📊 | Live status — temperature, progress, layers, remaining time, camera stream |
| 🎨 | AMS / multicolor — filament slots, per-channel remapping, MMU emulation for OrcaSlicer filament sync |
| 🗂️ | GCode browser — uploaded files with thumbnails, print history, search & filter |
| 🧩 | Multi-printer — multiple printers in one bridge instance, switch via dropdown |
| ➕ | Add a printer with one click — just enter the IP, credentials are imported automatically |
| 🔄 | Self-update — install new versions directly in the browser |
| 🌐 | OrcaSlicer — full Moonraker protocol (HTTP + WebSocket), EN/DE UI |
🚀 Quick Start
1. Prepare the printer
Enable LAN mode on the Kobra X: Printer display → Settings → Enable LAN mode
2. Start the bridge
Docker (recommended):
docker compose up -d
Linux binary (no Docker):
chmod +x kx-bridge && ./kx-bridge
Windows EXE (no Docker):
kx-bridge.exe
config\anddata\are created next to the EXE — portable.
With the Linux and Windows binaries,
config/anddata/(settings, SQLite, GCode store) live next to the program. Copy the whole folder = move the installation.
Python directly:
pip install -r bridge/requirements.txt
python bridge/kobrax_moonraker_bridge.py
3. Set up the printer
Open the Web UI: http://BRIDGE-IP:7125
On first start the Printers tab shows "+ Add printer" — just enter the printer's IP address, the rest (username, password, device ID) is fetched from the printer and decrypted automatically. Done.
More than one printer? Just click "+ Add printer" again — each gets its own port (7125, 7126, …) and is selectable from the header dropdown.
4. Connect OrcaSlicer
Printer → Connection type Moonraker → Host: http://BRIDGE-IP:7125
⚠️ Connection type must be Moonraker (not "Bambu" or "Klipper"). Enter the full URL including
http://and port:7125in the host field.
📺 Video Tutorial
🔧 Getting credentials manually
Normally not needed — "+ Add printer" does this automatically. If you do need it:
fetch_credentials --ip 192.168.x.x --write-config
Fetches the credentials directly from the printer via HTTP and writes them to config/config.ini.
Only the printer IP is required, no slicer.
Alternatively (if the IP is unknown): open AnycubicSlicerNext, connect the printer, then run
extract_credentials → outputs username, password, device ID and the printer IP.
Downloads: Releases →
fetch_credentials/extract_credentials(Linux & Windows)
⚙️ Useful commands
docker compose logs -f       # show logs
docker compose down          # stop the bridge
docker compose up -d --build # rebuild & start (after an update)
🩹 Troubleshooting
"Wrong MQTT credentials" on start
- Re-add the printer via "+ Add printer", or run
fetch_credentials --ip <ip> --write-configand restart the bridge - Enter only the IP address, no port (✗
192.168.1.102:9883→ ✓192.168.1.102)
Printer not found / no LAN mode
- On the printer display: Settings → Enable LAN mode
- Printer and bridge must be on the same network
Docker: Permission denied
sudo usermod -aG docker $USER # then log out and back in
Upgrading from 0.9.1 or earlier
Starting with 0.9.2, KX-Bridge stores settings in config/config.ini instead of .env.
Migration runs automatically on first start after the upgrade — no action required.
🔒 Security
- The bridge is reachable on the local network at
http://<host-IP>:7125— do not expose it to the internet config/config.inicontains printer credentials — do not share publicly- The credentials do not grant access to Anycubic cloud services
📄 License
Interoperability research under §69e UrhG — private, non-commercial use only.
If KX-Bridge helps you, the project appreciates your support:
